|
Suncoast Scale Model Boat Club
© 2023
Located in the Tampa Bay area
of Florida, the Suncoast Scale Model Boat Club is a organization for those who have radio controlled operational scale
model boats. We welcome all experienced in this hobby as well as those new and in need of help getting started in scale model boat building.
|
Welcome to our Home Page!
 I use a GoPro Hero 4 Silver that is an older model but works great. For water and rough use I place it in the waterproof case.
This cuts down on the sound some but it is a good safety measure as thesee oldr GoPro cameras still over $100 (in 2020).
I use a GoPro Hero 4 Silver that is an older model but works great. For water and rough use I place it in the waterproof case.
This cuts down on the sound some but it is a good safety measure as thesee oldr GoPro cameras still over $100 (in 2020).
As for the boat, my July 19, 2020 video was taken from my Springer pushboat. Big mistake as this 18" long boat, although on the heavy side for a boat that small, it is very bouncy and this reflects the quality of the video very much. The boat with it's rounded under bow did not help much. So right after puting this video together I decided to move the gimbal to the rescue boat (Miss Amelia) that many have seen. This boat is perhaps a little lighter (not much) slightly longer, about 3" more beam, and a bow thaat will cut the water much better.
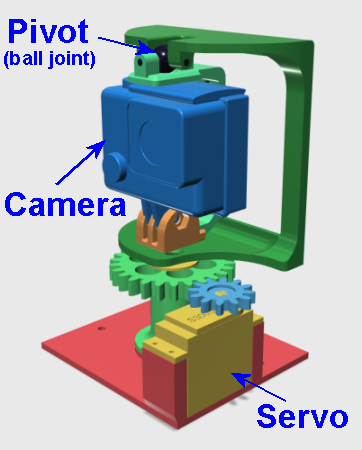
Next is designing and building the "rotating gravit gimbal." You may ask "what the heck is that?" Well, first the gravity part. If anyone has seen a video with the camera fixed to the boat you will notice that the features the camera does not move. Only the water, shore, and other boats move. If the camera is pointed straight ahead and you see the bow it will always be in the video and in the same position. If the boat leans to one side the horizon will tilt as well in the video, not too realistic.
The entire assembly was 3D designed (solid modeling) and printed on my 3D printer in ABS.
The "rotating gravity gimbal" is designed so the camera is suspended belod th pivon point. This will allow the camer to hand down in both direstions, if the boat should lean one side or the other or the bow goes up and down. A little weight was (after the first video) added to the swinging arm after the first video to stabilize the camera whhich swung back ad forth rather than just settle down with the tilt.
Realism drove the need for the gimbal to rotate. Again, with a person standing on a boat taking a video will usually not focus continuously on one spot, especially when recording something not on the boat (shore, other boats). So I made the gimbal to rotate. This was don by modifying a servo so it will continuously rotate in either direction and varying speeds.
 The
product: If you select this module you will get to the details page and see a good photo (also at the left). The unit comes
completely wired. There are two circuit boards, the main board and the battery board, plus the speaker and a push button switch. Everything but
the switch is on a peel and stick paper backing. The main and battery board will flex relative to each other but the edges must be close
because of the short wires. The 40mm diameter speaker has a little more flexibility. The paper can be cut to move the speaker around somewhat
but you could also solder longer wires. The switch can be replace with a lever-micro-switch (which they enclosed).
The
product: If you select this module you will get to the details page and see a good photo (also at the left). The unit comes
completely wired. There are two circuit boards, the main board and the battery board, plus the speaker and a push button switch. Everything but
the switch is on a peel and stick paper backing. The main and battery board will flex relative to each other but the edges must be close
because of the short wires. The 40mm diameter speaker has a little more flexibility. The paper can be cut to move the speaker around somewhat
but you could also solder longer wires. The switch can be replace with a lever-micro-switch (which they enclosed).
News
July 19, 2020 Meet: (by Lew) After a long time since taking on board videos,
I decide to break out my GoPro camera and make a "rotating gravity gimbal" mount for it. One of the SSMBC membes asked about
taking videos from a boat and my recomendations. There are so many cameras out there, down to some really small "secret" ones so
it is hard to recommend any specific one. Everyone has their own needs. But here is some information on what I have:
I use a GoPro Hero 4 Silver that is an older model but works great. For water and rough use I place it in the waterproof case.
This cuts down on the sound some but it is a good safety measure as thesee oldr GoPro cameras still over $100 (in 2020).As for the boat, my July 19, 2020 video was taken from my Springer pushboat. Big mistake as this 18" long boat, although on the heavy side for a boat that small, it is very bouncy and this reflects the quality of the video very much. The boat with it's rounded under bow did not help much. So right after puting this video together I decided to move the gimbal to the rescue boat (Miss Amelia) that many have seen. This boat is perhaps a little lighter (not much) slightly longer, about 3" more beam, and a bow thaat will cut the water much better.
Next is designing and building the "rotating gravit gimbal." You may ask "what the heck is that?" Well, first the gravity part. If anyone has seen a video with the camera fixed to the boat you will notice that the features the camera does not move. Only the water, shore, and other boats move. If the camera is pointed straight ahead and you see the bow it will always be in the video and in the same position. If the boat leans to one side the horizon will tilt as well in the video, not too realistic.
The entire assembly was 3D designed (solid modeling) and printed on my 3D printer in ABS.
The "rotating gravity gimbal" is designed so the camera is suspended belod th pivon point. This will allow the camer to hand down in both direstions, if the boat should lean one side or the other or the bow goes up and down. A little weight was (after the first video) added to the swinging arm after the first video to stabilize the camera whhich swung back ad forth rather than just settle down with the tilt.
Realism drove the need for the gimbal to rotate. Again, with a person standing on a boat taking a video will usually not focus continuously on one spot, especially when recording something not on the boat (shore, other boats). So I made the gimbal to rotate. This was don by modifying a servo so it will continuously rotate in either direction and varying speeds.
November 16, 2014 Meet: A wonderful milestone was achieved on this day. We counted 14 heads:
Existing members; faces we have not seen in a while; new members (a lot); a few visitors. (See photos in Gallery 11.) Nice to have new
members, many with prior experience bringing new ideas to the club.
March 30, 2014 Meet: We had our first meet on this day. Jim launched his new whaleback freighter.
It handled extremely well, much better than anticipated. It looked equal well in the water. (See photos in Gallery 3.) We
also had our new "portable" docking system. We plan to add a few more modules and make a port.
June 28, 2015 Meet: Info on an inexpensive sound module.
Website:
electronics123.com
First, check out their site – they have a lot of stuff. I bought the 75 second USB sound recording module (its on their first page). It costs $10.95 plus S&H. The shipping was $5.49
The
product: If you select this module you will get to the details page and see a good photo (also at the left). The unit comes
completely wired. There are two circuit boards, the main board and the battery board, plus the speaker and a push button switch. Everything but
the switch is on a peel and stick paper backing. The main and battery board will flex relative to each other but the edges must be close
because of the short wires. The 40mm diameter speaker has a little more flexibility. The paper can be cut to move the speaker around somewhat
but you could also solder longer wires. The switch can be replace with a lever-micro-switch (which they enclosed).Note that this device only plays “.wav” files. (See the process, below.)
It records 75 seconds at low quality or 15 seconds at high quality. 15 seconds is enough for most horns.
When you get the unit you download software (free) from their site. This software is what get your sound file onto the module. There is also free
(but limited) software for converting files. I have my own software. At the bottom of the page for the specific module you will see the
documentation and downloads section. There is also a link to a demonstration video. Check out the trigger (push of the button)
functions on the software manual link. There is more choices than a simple one push of the button. Even better check the Q & A page – more details.
Operating the unit: I don’t know if anyone makes a device that plugs
into the RC receiver and acts like a switch. It would be nice if someone does. Right now I plan on using an extra channel and servo to actuate
the modules switch and “blow the horn.”
What I did to get started: After getting the module I downloaded the software. I had trouble and the software widow
was not right. I followed the instructions and deleted the files, rebooted my PC, then turned off my anti-virus software. I repeated the
download and the window did not come up correctly again. I couldn’t do a board check but I was able to upload my sound to the module and that works great.
The module plugs directly into a USB port on the PC. You can also use a male to female USB extension cord. These are all standard USB
connectors, not the mini or micro USB connectors.
Getting the sound: I noticed a towboat with the sound I wanted on a youtube video. First I had to rip the video and
download it to my computer. Then I had to rip out the sound using NCH Software (free)and convert it to a “.wav” file. I then used the
Microsoft Wavepad Sound Editor to clean up the sound and shorten it (that blast was really long (over 12 seconds) down to 4-1/2 seconds.
Once I got the file ready all I had to do was open the E-123 software, bring in the file, select the model then write it to the module.
If you are like me you would like an enclosure for this module. Remember, this is a bare unit. Be careful in handling it as well as away
from metal or wires that could short it out. Also, E-123 recommends some mounting for the speaker to improve sound quality. I had some left over
Plexiglas and made an enclosure. I also made a 2” long hood the diameter of the speaker from a medicine dispenser cap, kind of a horn to focus
the sound. If you are not experienced on sound in a model boat an enclosed superstructure is the enemy of a sound unit. I had a Graupner
sound unit with a 4” speaker and it was quite muffled until I added holes in the stack. Where this unit is going I will have open doors
(like many towboats) which will let the sound out.
Other ways to get the sound: There are plenty of sound files out there on the internet, some free and some for a fee to
download.
What this doesn’t do: If you want to have the engine sound where the sound varies with the engine speeds (voltage
going to the motors) this will not work. You could have a continuous put-put sound of a constant speed motor you could have the sound loop
until you stop it. I might do this for my trawler.
Satisfaction: I was completely satisfied with the outcome. I do wish the software options were all there. I will order
more of these units for other boats.
Other choices from E-123: There is a 300 second USB recording module$15.99) with 4 buttons offering more independent
sounds on the same module if you want multiple sounds. They also have ABS boxes in case you don’t want to make your own enclosure.
I got an email from Bud (TCRC club on the east coast) and in his words: “Found them [the electronics123 module] about 5 years ago and they
worked out great.”
Lew